Ministry of Transport (MOT) Testing
The MOT (Ministry of Transport) test is a regular inspection of vehicle safety, roadworthiness and exhaust emissions. Tesla vehicles should undergo an inspection or be taken to a third-party test centre to have their test evaluation and certification.
Note: MOT tests are not offered at Tesla Service Centers.
Learn about Tesla-specific details aimed to facilitate the inspection such as VIN locations, jacking points, settings for free wheeling and brake test procedures. The information presented here is not intended, and should not be relied upon, as a comprehensive overview of period inspection requirements.
You can review the latest information in the Service Manuals.
The Vehicle Identification Number (VIN) on Tesla vehicles is visible in the locations shown below.
If the vehicle is equipped with an OBD connector, it is located on the underside of the dashboard in the driver’s footwell. Some Model 3 and Model Y vehicles might not have an OBD connector installed, as this was not mandatory for electric vehicles until 2024.
Learn more about diagnostic cables in the Tesla Service Portal.
When the customer brings in the vehicle for testing, make sure that the PIN to Drive function is disabled by the customer. When PIN to Drive is enabled, some tests cannot be performed when you do not have the customer’s PIN.
 Safety Considerations
Consider the following when attempting to lift your vehicle:
- To reduce the risk of personal injury, use appropriate equipment while performing this operation.
- Never raise the vehicle when a charge cable is connected, even if charging is not in progress.
- Do not work on an incorrectly supported vehicle. Doing so can cause serious damage, bodily injury or death.
Air Suspension
Before lifting your vehicle, identify whether it is equipped with air suspension. Certain Model S and all Model X vehicles are equipped with air suspension. To identify if your Model S vehicle is equipped with air suspension, open 'Controls' on your vehicle's touchscreen. If the vehicle is equipped with air suspension, a 'Suspension' tab is shown on the left menu of your vehicle's touchscreen.
If your vehicle is equipped with air suspension, you must activate Jack Mode. Before activating Jack Mode, make sure the vehicle is turned on and that the vehicle key is recognized.
You can activate Jack Mode from your vehicle's touchscreen by following these steps:
- Tap 'Controls' > 'Suspension.'
- Press the brake pedal and tap 'Very High' to maximize the height of the suspension.
- Keep the brake pedal pressed, and tap 'Controls' > 'Service' > 'Jack Mode' to disable self-levelling.
- To check whether Jack Mode is active, tap 'Controls' > 'Suspension.' The display shows a wheel removed when Jack Mode is active. Jack Mode can be cancelled by tapping the ‘Jack Mode’ button again or by driving the vehicle at a speed over 7 km/h.
Note: Failure to activate Jack Mode before lifting the vehicle could lead to suspension damage and could cause serious personal injury.
Lifting Instructions
Lift your vehicle using the following steps:
- If your vehicle is equipped with air suspension, activate Jack Mode.
- Position the vehicle centrally between the lift posts.
- Position the lifting arm pads under the body rails at the four locations shown below (locations in green, Figure 1 and Figure 2).
Note: Make sure that the lifting equipment does not touch the high voltage battery on any other location than on the dedicated lifting points (locations in red, Figure 1 and Figure 2). Lifting the vehicle on other locations than on the indicated lifting points can cause damage to the high voltage battery. - Adjust the height and position of the lift arm pads to make sure that they are correctly located.
- With assistance, raise the lift, making sure that the lift arm pads remain in their correct positions.

Figure 1: Lifting points - Model S and Model X

Figure 2: Lifting points on HV battery - Model 3 and Model Y
Keeping the Vehicle in Neutral
As a standard safety feature, Tesla vehicles automatically engage the parking brake when it detects that the driver is leaving the vehicle, even if Neutral has been selected. Enable Tow Mode to make sure that the wheels roll freely without an occupant in the vehicle.
Warning
Before entering Tow Mode, make sure that the vehicle is on flat ground and the wheels are chocked to avoid movement. Do not work on a vehicle that does not have its wheels chocked. Doing so can cause serious damage, bodily injury or death.
Enabling Tow Mode
As a standard safety feature, Tesla vehicles automatically engage the parking brake when it detects a driver is leaving the vehicle, even if Neutral has been selected. Enable Tow Mode to make sure that the wheels roll freely without an occupant in the vehicle.
To enable Tow Mode from your vehicle's touchscreen, follow these steps:
- Shift into Park.
- Tap 'Controls' > 'Service.'
- Select 'Towing.'
Note: If you see a toggle labelled 'Tow Mode' in the 'Service' menu, tap the toggle instead of the 'Enter Tow Mode' button in step 5. - Press and hold the brake pedal and make sure the key is in the car.
- Tap 'Enter Tow Mode.'
When you hear the rear parking brake disengage, the vehicle has entered Tow Mode.
Note: In Tow Mode, the vehicle does not shift into a driving gear.
To exit Tow Mode, you can either shift into Park using the gear selector stalk or tap ‘Exit Tow Mode.’
Note: If you enabled Tow Mode by toggling 'Tow Mode' in the 'Service' menu, exit Tow Mode by tapping the toggle again.
Electronic Parking Brake (EPB) Test
To test the efficiency of the individual parking brake, EPB Dynamic Mode must be activated. This is designed to slow the vehicle to a stop at a moderate rate using only the parking brake calipers and not the hydraulic brake calipers. This is an emergency feature in case of hydraulic pressure loss.
To activate the EPB Dynamic Mode, follow these steps:
- Drive the vehicle on a rolling road.
- Shift into Neutral.
- Press and hold the Park button on the gear selector stalk until the rear wheels stop rotating.
To release the parking brake, shift into Drive.
Brake Servo Test
Only early Model S vehicles, not equipped with Autopilot (built before September 2014), were equipped with a vacuum assisted Brake Booster (4 in Figure 3).

Figure 3: Vacuum assisted brake booster
To identify whether the vehicle is equipped with Autopilot, tap 'Controls' (vehicle icon) in the lower left-hand corner (left-hand drive) or lower right-hand corner (right-hand drive) of your vehicle's touchscreen. If the vehicle is equipped with Autopilot, a 'Self-Driving' tab is shown on the left menu of your vehicle's touchscreen.
To perform the Brake Servo Test, follow these steps:
- Press the brake pedal. The vehicle turns on and the brake servo activates.
- Make sure that the vehicle does not fully power on. Move the vehicle key more than two meters away from the vehicle.
- When "Key Not Inside” displays on your vehicle's touchscreen, the brake servo is no longer activated and the brake pedal pressure test can then be performed.
To reactivate the brake servo, bring the vehicle key back into range. This will complete the test.
Tesla uses ball joints in the rear knuckle of Model 3 and Model Y. These ball joints (figure 4), especially the upper ball joint, may over time develop some axial and/or radial movement, or ‘play’. This play is acceptable if within the specifications as published in Tesla’s Service Manuals. This needs to be carefully considered in inspection activities, particularly during periodic roadworthiness inspections.
Learn how to assess the condition of the rear knuckle ball joints of these vehicles during periodic inspections and ensure continued roadworthiness.
This information is intended to support inspection activities and should be applied in conjunction with existing applicable regulations, but does not replace any applicable regulations.
The axial and radial operational clearance limits for all ball joints is defined in the respective Service Manuals for Model 3 and Model Y. These limits are based on the manufacturer's testing of safe wear limits, which have been validated to not cause any detrimental effect on the roadworthiness of the vehicle.
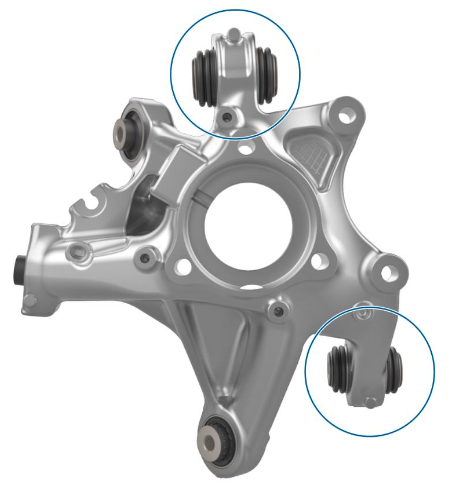
Figure 4
The following guidelines apply to Model 3 and Model Y:
| Model | Model Year | Total Axial and Radial Clearance in Rear Knuckle Ball Joints | Upper Position | Lower Position |
|---|---|---|---|---|
| Model 3 | 2017-2023 | 1.0 mm (0.039 in) | ✓ | ✓ |
| Model 3 (except Performance) | 2024+ | 1.0 mm (0.039 in) | ✓ | |
| Model 3 Performance | 2024+ | 1.0 mm (0.039 in) | ✓ | ✓ |
| Model Y | 2020-2024 | 1.0 mm (0.039 in) | ✓ | ✓ |
| Model Y | 2025+ | 1.0 mm (0.039 in) | ✓ |
Measuring Clearances on the Upper Ball Joint
You can find the specific procedure to measure clearance in the rear knuckle upper ball joint in the respective Service Manual for Model 3 and Model Y.
Because of the geometry of the system, a small amount of play in the rear knuckle upper ball joint can lead to more play at the circumference of the outer wheel. When inspecting vehicles, make sure to not mis-interpret acceptable amounts of play at the circumference of the outer wheel as indicating the play in the rear knuckle upper ball joint is exceeding the specification defined in the Service Manual.
The most significant movement is detected when the wheel is articulated by hand at the 1 and 7 o’clock position for the rear left wheel and the 5 and 11 o’clock position for the rear right wheel (figure 5).
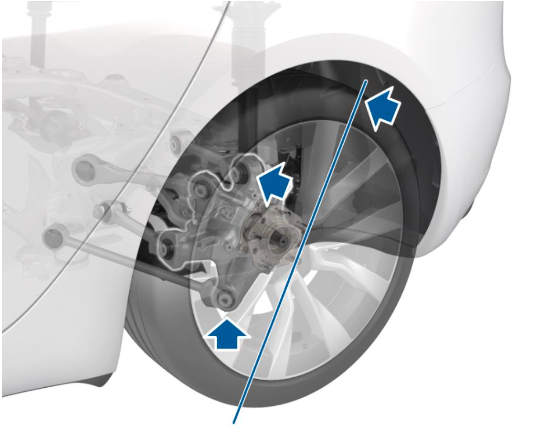
Figure 5
Select your vehicle to open the relevant section of the Service Manual: